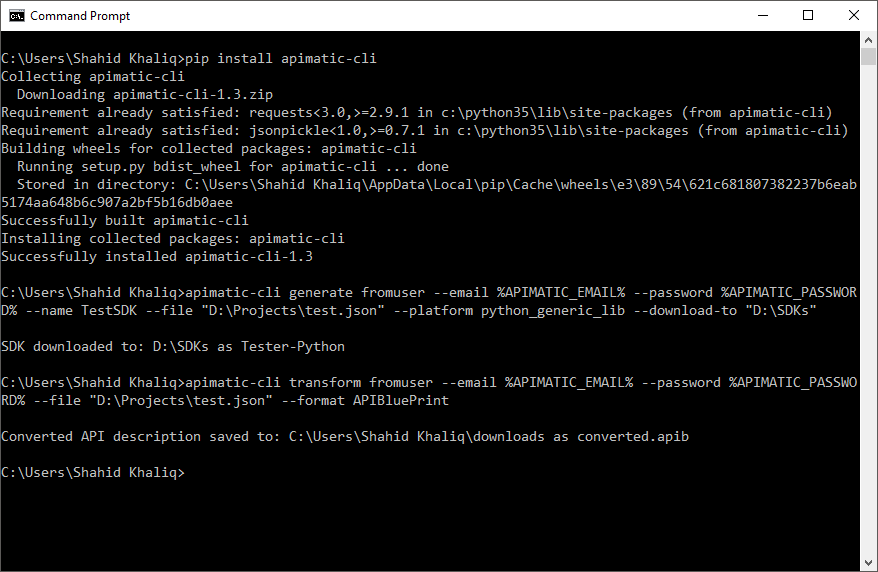
A large number of our users describe their APIs using our API editor and generate SDKs from our website. But there is an equally large niche of our users who prefer using our CodeGen API to generate SDKs or our Transformer API to transform their API descriptions. We set out with the goal of making the lives of these API users easier and came up with the APIMatic CLI.

APIMatic CLI is a command line tool written in Python which serves as a wrapper over our own Python SDK. It is available in the form of a small windows executable so you can easily plug it into your build cycle. You no longer have to write your own code or set up a development environment for the consumption of our APIs.
The APIMatic CLI will create the API request for you, call the API and download the generated SDK or the converted API description. It even supports unzipping of zipped SDK files. It allows multiple authentication methods and supports all the features of our APIs i.e. SDK generation, API validation and API transformation. You can provide an API description in multiple ways to it as well. It supports API integration keys from APIMatic, API description files from URLs and also allows you to upload API descriptions from your computer.
Getting started with the APIMatic CLI is very easy. Let’s take you through a few different methods of installation and show you some examples of its usage.
Installing APIMatic CLI
Since the APIMatic CLI is written in Python, you have multiple installation options. If you don’t have Python installed, the simplest way to go would be to just download the executable from here and run it. If you have Python installed, you can use pip to install the APIMatic CLI. Alternatively, you can install it manually or even directly run the code itself. You can check out the documentation on our Github page for clear instructions.
Usage
If you have installed APIMatic CLI using pip, you can start using it by typing:
apimatic-cli -hCommand (generate, validate or transform) and authentication (fromkey or fromuser) are the two positional arguments that have to be provided in order to use this tool. There is a whole list of options available for you to build your commands depending on the positional arguments you choose.
h or — help       Displays the help text and exists.
-api-key          The API key of the API description obtained from
                  APIMatic.
-platform         The platform for which the SDK needs to be
                  generated. It can be one of:
                  cs_portable_net_lib, java_eclipse_jre_lib,
                  java_gradle_android_lib,
                  objc_cocoa_touch_ios_lib, angular_javascript_lib,
                  ruby_generic_lib,
                  python_generic_lib, php_generic_lib,
                  node_javascript_lib, go_generic_lib
-download-to      The path of the folder in which to download the
                  file.
-name             The name of the generated SDK.
-email            The email address of the user’s APIMatic account.
-password         The password of the user’s APIMatic account.
-url              The URL of the API description.
-file             The path of the API description file.
-format           The format to convert the API description to. It
                  can be one of:
                  APIBluePrint, Swagger10, Swagger20, SwaggerYaml,
                  WADL2009, RAML, APIMATIC
-download-as      The name (and extension) of the downloaded file.
-skip-unzip       Unzipping of downloaded SDKs is skipped if this
                  option is used.
Now, for instance, you want to generate a C# SDK using an API integration key, all you need to type is:
apimatic-cli generate fromkey — api-key <your key> — platform cs_portable_net_lib — download-to ./SDKsSimilarly, if you want to generate a python SDK using user credentials and an API description file while skipping the unzipping part, you can write the following command line:
apimatic-cli generate fromuser — email <your APIMatic account email> — password <your APIMatic account password> — name TestSDK — file ./data/calculator.json — platform python_generic_lib — download-to ./SDKs — skip-unzipIn this way, whatever functions you’d want to perform, all you’ll need to do is type a command on your CLI and that’s it. I hope this article provides sufficient information regarding APIMatic CLI and its usage. For more information, you can always check it out on GitHub where complete documentation is provided.


